Monday, January 12, 2015
HOW TO DRAW A LIGHTED CANDLE IN MS WORD PART 3
MICROSOFT WORD DRAWING PROJECT No. 23 PART 3
TITLE: HOW TO DRAW A LIGHTED CANDLE IN MS WORD
TYPE: GRAPHIC DESIGN
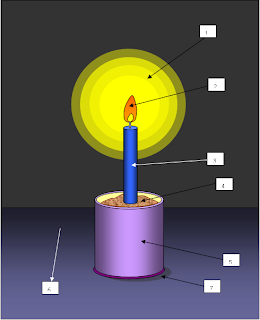
(B) HOW TO CREATE THE EFFECTS FOR THE ILLUSTRATION?
Users of Microsoft Word 2010 and 2007 can create effects for graphics with the tools on the Format tab. Click at a drawing object to reveal the Format tab on the Standard Toolbar. Click the arrow next to Shape Fill and you will find most of the tools needed to create effects for your graphics. The Gradient option with a variety of variations is mostly used to create 3-D effects to drawing objects. By the way, if MS Word has the Feathering option like Photoshop, the candle light effect will be more realistic. I will use a table to explain how these effects are created.

Effect No. | Tools | How to do it? |
1 | Shape Fill More Fill Colors | Fill object with Yellow colour Move Transparency slider to 40% on Standard tab |
2 | Shape Fill > Theme Colors Gradient > More Gradients > Colors > Shading Styles | Two Colors > Orange, Accent 6, Darker 25% & Yellow Horizontal > Choose Variant No. 1 (Top Left) > OK |
3 | Shape Fill Gradient > Colors > Shading Styles | Fill object with Blue colour Vertical > Choose Variant No. 4 (Bottom Right) > OK |
4 | Shape Fill > Texture | Sand |
5 | Shape Fill Gradient > Colors > Shading Styles | Two Colors > Purple & Purple, Accent 4, Lighter 60% Vertical > Choose Variant No. 4 (Bottom Right) > OK |
6 | Shape Fill Gradient > Colors > Shading Styles | Fill object with Aqua colour Horizontal > Choose Variant No. 2 (Top Right) > OK |
Oval > Shape Fill | Fill object with Black, Text 1, Lighter 35% |
Subscribe to:
Post Comments (Atom)
No comments:
Post a Comment
Note: Only a member of this blog may post a comment.