Thursday, January 22, 2015
Android beginner tutorial Part 46 DatePickerDialog
Today we will learn how to add and use a DatePickerDialog.First make sure theres a button in the Activity layout (activity_main.xml):
<LinearLayout xmlns:android="http://schemas.android.com/apk/res/android"
    xmlns:tools="http://schemas.android.com/tools"
    android:layout_width="match_parent"
    android:layout_height="match_parent"
    android:orientation="vertical"
    tools:context=".MainActivity" >

<Button
    android:id="@+id/testButton"
    android:layout_width="fill_parent"
    android:layout_height="wrap_content"
    android:text="Call an DatePickerDialog"
    />

</LinearLayout>
Now go to MainActivity.java class and declare a DatePickerDialog instance:
public DatePickerDialog myDialog;
In the onCreate() function, add a click listener to the button. Inside the onClick() handler function, set myDialog to a new DatePickerDialog instance and then call show() method of myDialog.
The DatePickerDialog constructor gets 5 parameters - context, OnDateSetListener object, year, month and day that are set by default.
The OnDateSetListener() object has an onDateSet() method that receives the following parameters: view, year, monthOfYear and dayOfMonth. We can display them using a toast.
Remember that month values range from 0-11. So, january is 0th month and december is 11th.
@Override
protected void onCreate(Bundle savedInstanceState) {
super.onCreate(savedInstanceState);
setRequestedOrientation(ActivityInfo.SCREEN_ORIENTATION_PORTRAIT);
setContentView(R.layout.activity_main);

Button button = (Button)findViewById(R.id.testButton);

button.setOnClickListener(new View.OnClickListener() {

@Override
public void onClick(View v) {
myDialog = new DatePickerDialog(MainActivity.this, 0, new OnDateSetListener() {

@Override
public void onDateSet(DatePicker view, int year, int monthOfYear,
int dayOfMonth) {
String date = (monthOfYear+1) + "/" + dayOfMonth + "/" + year;
Toast toast = Toast.makeText(MainActivity.this, date, Toast.LENGTH_SHORT);
toast.show();
}
}, 2012, 11, 31);
myDialog.show();
}
});

}
Full code:
package com.kircode.codeforfood_test;

import android.app.Activity;
import android.app.DatePickerDialog;
import android.app.DatePickerDialog.OnDateSetListener;
import android.content.pm.ActivityInfo;
import android.os.Bundle;
import android.view.Menu;
import android.view.View;
import android.widget.Button;
import android.widget.DatePicker;
import android.widget.Toast;

public class MainActivity extends Activity{

public DatePickerDialog myDialog;

@Override
protected void onCreate(Bundle savedInstanceState) {
super.onCreate(savedInstanceState);
setRequestedOrientation(ActivityInfo.SCREEN_ORIENTATION_PORTRAIT);
setContentView(R.layout.activity_main);

Button button = (Button)findViewById(R.id.testButton);

button.setOnClickListener(new View.OnClickListener() {

@Override
public void onClick(View v) {
myDialog = new DatePickerDialog(MainActivity.this, 0, new OnDateSetListener() {

@Override
public void onDateSet(DatePicker view, int year, int monthOfYear,
int dayOfMonth) {
String date = (monthOfYear+1) + "/" + dayOfMonth + "/" + year;
Toast toast = Toast.makeText(MainActivity.this, date, Toast.LENGTH_SHORT);
toast.show();
}
}, 2012, 11, 31);
myDialog.show();
}
});

}

@Override
public boolean onCreateOptionsMenu(Menu menu) {
// Inflate the menu; this adds items to the action bar if it is present.
getMenuInflater().inflate(R.menu.activity_main, menu);
return true;
}

}
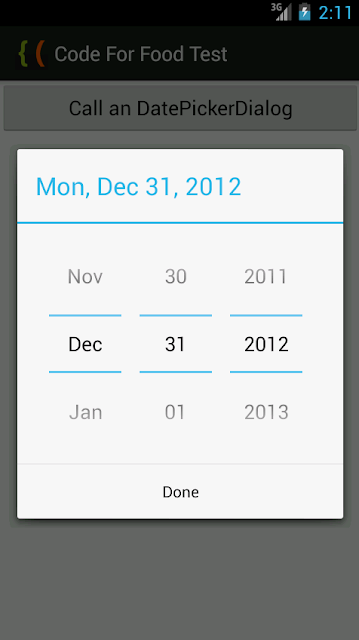
The results look like this:

Thanks for reading!
Subscribe to:
Post Comments (Atom)
No comments:
Post a Comment
Note: Only a member of this blog may post a comment.